How to make a glove turkey craft for Thanksgiving

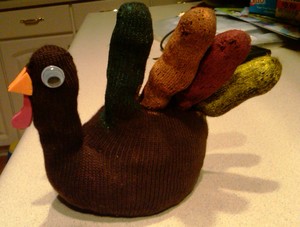
Doesn't this guy just have Gobble Gobble written all over him?
Melissa Boehling | Contributor
It struck me while watching my daughter get her foot painted with brown paint for her preschool class Thanksgiving turkey project and I was standing there waiting to put her coat and gloves on. My goal is, as much as possible, to create less paper that has to go home. Lord knows I end up with huge piles, it seems, after two days, between the kids' school papers, projects, mail, etc. I go through it: organize, recycle, shred, and then it starts over.
At this point you may be thinking, "Okay, so what struck you, and exactly what do gloves and turkey noises have to do with each other?" It’s the latest project we’ve created which is to make a cute turkey out of a glove. It’s something they can treasure or use to decorate their room but that isn’t another paper craft you have to find place to tape or keep. Now this doesn’t mean I won’t be guilty of creating more crafts that will use paper, but at least I can say I tried not to contribute once in a while.
Exactly how do you create a Gobble Gobble Glove by using a single glove, paint, filling and a little bit of sewing or no-sew tape? Well I’m going to explain just that below.
For the glove, you can either go buy brown stretch knit gloves from a dollar store or even use a knitted glove that no longer has a match. If it’s not brown then that just means a bit more painting fun. I was able to buy a two pair pack for a $1 at the Dollar Tree. Now they came in one pair brown and one pair black, but I figured the black pairs can just be kept for spare gloves for the winter.
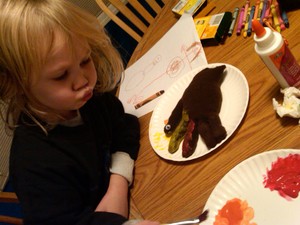
As for the paint, I just had the kids use fabric paint, and they painted each of the fingers a different color in the shades of fall (green, orange, red and yellow).
The eyes were just glued on googly eyes, which you can also get at the Dollar Tree. One bag had a ton of eyes of all sizes. We used the smallest size in the bag, and the rest will be saved for future projects.

Painting the "feathers"
Melissa Boehling | Contributor
The beak and wattle (or as my kids call it the beard) of the turkey are made out of foam. I had foam stickers that I was able to cut into shapes needed.
The filling was a combination of using old material (in our case an old stained white turtleneck) cut into strips or pieces and dry kidney beans (also at the Dollar Tree).
You’ll then sew the cuff together to create the seal and keep the filling from coming out. I am not a seamstress and rarely sew, but this just need some basic stitching. If you use the same color brown thread as or close enough to the glove's color, the stitches won’t be that noticeable, especially since it will be the bottom of the turkey. The other option which I haven’t personally tested would be to use no-sew tape/sealant.
Now once I did this project with the kids it did take a little longer than most our projects, but the kids loved the outcome. If your child gets restless, you could break the project down into parts, doing certain steps each day or, say, part in the morning and then the rest in the evening.
The end result is a great decorative beanie-like turkey. Step by step directions are below. Please feel free to share your fun Thanksgiving projects and let us know if you try this project out and how it went.
1) Rip and/or cut material into small one- to two-inch pieces.
2) Stuff the pieces into the fingers and thumb until they are full enough to stay straight. We had some bumps in ours, but it didn’t take away from the overall effect.
3) Take the bottom cuff area of the glove and fold back over the fingers.
4) Sew or use no-sew tape to seal approx one half of the cuff together. You want to be sure you leave enough of the cuff un-sewn/sealed together so that you can pull the fingers and glove back through as well have an area to finish stuff the glove.
5) Pull the fingers and palm area of the glove back through the open area of the cuff.
6) Take the kidney beans and finish filling up the glove. Make sure you fill it as much as possible as it will sit better the more full the glove is.
7) After it is full, sew or no-sew tape the rest of the cuff together. In essence you are creating a seal similar to making a throw pillow. I haven’t made a pillow but have looked at many and seen my mother make them.
8) Set the glove so that the fingers and thumb are standing up. Basically the feathers and head are sitting up, and the rest, of course, is the turkey body.
9) Paint the fingers with fabric paint. We did a different color for each finger. You can either paint the fingers with the glove laying down or sitting up.
10) Glue on googly eyes. One of each side of the head (thumb).
11) Cut two triangles out of orange foam. If they are sticky backed, then you can stick them on each side of the thumb but close enough to also stick to each other. You can also just glue them together and then onto the thumb for the beak.
12) Cut out the wattle out of red foam. I cut one and then put it back against the foam to match and then glued it on, similar to process with the beak.
13) Optional. Have the kids write their name on the turkey either on the side or the bottom if they’d rather with a fabric marker or some of the fabric paint. You may also have them write the year so they and you can remember when it was made if you make it a tradition to bring it out for Thanksgiving.
You have now made a wonderful new decoration for Thanksgiving! Gobble Gobble!
Melissa Boehling is owner and primary provider for Starry Night Child Care, IT consultant as well a mother of a 7-year-old son and 4-year-old daughter.

