Making chunky crayons: re-creating art supplies
If you have young children, and by “young,” I mean kids under the age of twelve, chances are you have little art things hanging around your house. Most of those “little art things” in my house are broken crayons, and thanks to the ingenuity of another mom on one of my listservs, I got rid of all of those annoying broken crayons and created something new and fun to use for artwork.
It’s not that broken crayons don’t colour as well as the big, whole ones. It’s not that the broken ones aren’t useable by little fingers. It just that … well … they are incomplete. And in my house at least, they become less-desirable and less-used than whole crayons... and, ultimately, easier to forget about, leave lying around, etc., which is a frustration-point for me, as I pick them up when vacuuming and cleaning.
Crayola has come up with a device that melts broken bits and makes new crayons (minus the paper, of course), but I’m not going to drop $20+ on something that will eventually collect dust and/or break when I can do the same thing at home with a little time and creativity.

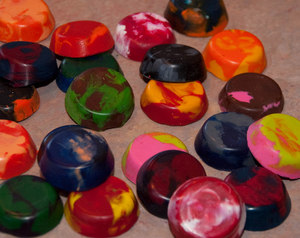
Chunky crayons, made from crayon-nubs.
The next task was to figure out what I could use for molding the crayon once it was melted. Of course I could come up with cool colour combinations - I’m a florist by trade and training; I know how to pair colours. But I had to find a suitable mold. So off to Hobby Lobby we went, because it was on the way to and from Canton one day.
There were silicone candy molds which were $10 per mold and there were soap molds, which were significantly less costly. But neither was right - we didn’t like the depth of the soap molds and knew the plastic wasn’t oven-proof, and I wasn’t about to pay $10 for a single silicone mold that I couldn’t/wouldn’t re-use. That just felt wasteful.

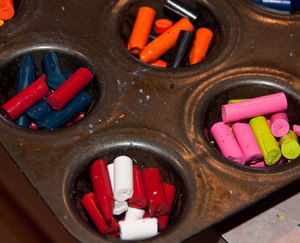
Broken crayon pieces awaiting a new existence as chunky crayons.
And so I came back to scour my own kitchen. I came across a dying and not-oft-used mini muffin pan and realized that before I disposed of it, I would get one last use from it. It had served me well over the years but lost its non-stick finish due to scratches and whatnot, and I have come to a place where I’d rather not cook or bake with non-stick things, if possible.
We peeled the crayons - my son mumbling about how hard they were to peel, and me using an X-acto Knife to cut the paper and easily unwrap it from the broken crayon’s body. We put the crayon bits in the muffin cups that were liberally greased with my all-time-favourite oil (coconut oil), choosing colours that coordinate well and some that are just fun. What would a melted crayon be without having a camoflaged-coloured one at the ready, especially for the 8 year-old boy?
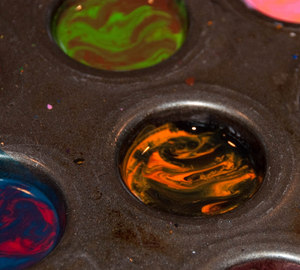
I chose a low temperature of 275 degrees F and put our tray of Frankenstein-inspired crayon cups in. I watched the pan carefully for about seven minutes, saw no smoking of the wax and some pretty decent melting and gave it another 30 seconds. I carefully pulled the pan out, placed it on the counter and used a wooden skewer to achieve a cool swirly-pattern in each of the chunky-crayons.

Molten wax for chunky crayons, swirled with a wooden skewer.
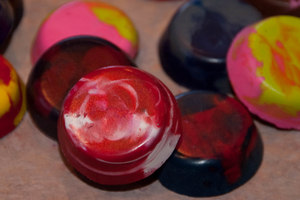
The end result was definitely fun, and the crayons are regularly used by our son now. He loves the color combinations and the edges produced by the muffin tins that give him sharp lines when drawing and coloring. I did, however, learn a few things in case you’d like to try this at your home.
1) Don’t use coconut oil in a pan that has sticking-issues. I honestly thought my go-to oil would adequately allow the crayon-molds to release from their baking-place, but it didn’t. It might’ve been my pan or it might’ve been the oil - but if I’d had nonstick spray around, that probably would’ve been better. Live and learn, right?
2) If I’d thought about it, I might’ve picked up a package of mini-muffin tin liners. That would have made the removal-from-the-pan issue a non-issue, even though the chunky crayons would have had a ridged edge.The finished chunky crayons.
3) If you try to swirl the crayon colours once the chunky crayons are molten, don’t be shy about the movements you make. I thought a toothpick would be too small a device to get a good swirl and that a skewer would provide a better swirly pattern. I got some swirling, but not nearly enough. I would have done better if I’d used a popsicle stick, knife, or something with a broader side to sweep through the pockets of colour.
I hope this encourages you to look at your kids’ art supplies in a new and out-of-the-box way. Crayons are a fun part of childhood, and when you can give them a new lease on life, you also give your kids a new lease on creativity as they use their supplies in ways they couldn’t before.
Sue is a photographer, writer, wife and homeschooling mom who juggles many things in her life, sometimes successfully. You can contact her via e-mail and read her regular ramblings at A Mother's Heart.
All photos c. 2010, Sue Talbert, A Mother's Heart Photography


Comments
Sue Talbert
Thu, Mar 4, 2010 : 1:52 p.m.
Thanks, Stefan. I like the idea of using tin foil to make molds - that's really cool! :)
Stefan Szumko
Thu, Mar 4, 2010 : 1:38 p.m.
Thanks, Sue. Chunky crayons - I like it. I've made a double boiler with a large juice can to melt the crayons into a single color. I wrapped aluminum foil around my finger to make molds. I was surprised by the detail I got, including my fingernail. I also like the use of old cookware for this project. I've recycled or donated a few cooking sheets, pie tins, or muffin thingies in the past.
Sue Talbert
Wed, Mar 3, 2010 : 2:03 p.m.
I never thought about the "green" aspect, Tammy, just the "get rid of the crayon nibs and bits"-aspect.;) I'm pretty happy with how it turned out, but I'm not sure when we'll do it again, just for lack of mini muffin tin at this point.;)
Tammy Mayrend
Wed, Mar 3, 2010 : 1:52 p.m.
It's funny you did an article on this, we "re-used crayons" in the fall doing this very same thing - It's a GREAT way to be green!