
A new twist on making Halloween 'handprint' pumpkins
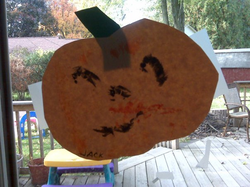
Pumpkin created with a 1 1/2-year-old. More assistance on placement.
Melissa Boehling | Contributor
In addition I had a varied age group to do the project with ages ranging from 6 months old to 1 ½ years old to 3 years old. As a good solution for such a varied group and kids that may be more antsy and enjoy a project more active, I came up with the following project that involves making pumpkins out of the sides of the hands.
The steps can be varied based on the age of children you will be working with. I try to let the kids do as much as they can on their own. For example: You may have the kids draw and/or cut out their own pumpkin shape.
Supplies:
- Orange, black and yellow paints (Used both washable Tempera and watercolor-type paints)
- Light orange or orange construction paper
- Green construction paper
- Paint shirts/bibs (we use old adult t-shirts)
- Old newspaper
- Baby wipes or soapy washcloth
Steps:
- Have the children put on the paint shirts/bibs.
- Place the newspaper on the table.
- Cut a pumpkin shape out of the light orange/orange construction paper.
- Cut a pumpkin stem shape out of the green construction paper.
- Using a yellow watercolor type of paint, put faint curved vertical lines on the pumpkins. You can do this or let the children depending on the age.
- Apply a small amount of orange Tempera paint to a paint brush to where its almost dry and brush it all over the pumpkin cut-out. It will create an effect where you can see the brush lines. (Variation for younger children: You can have them use a light orange or orange-yellow crayon and color all over the pumpkin cut-out.)
- Have the child face the outside side of their hand to you. Basically the side where their pinky is.
- Paint that side of their hand with the black Tempera paint from the top of their pinky down to the bottom of their pinky to the joint area.
- Have the child curl their finger up just to their second knuckle (or make a loose fist).
- Have the child stamp the painted side of their fist down for the first eye on the pumpkin. If they are young you may have to help them place it.
- Repeat for the second eye.
- Have the child tighten their finger so it’s all the way curled up and/or a tight fist and then stamp down for the nose. You may need to reapply some of the black paint.
- Have the child cup their hand and using that same painted side have them stamp their hand down for a mouth.
- Wash their hand immediately with wipes and/or soapy cloth.

Pumpkin by three year old with a little less assistance on placement
I hope you have lots of fun with this project with your own children in your life.
Melissa Boehling is the owner of Starry Night Child Care and is an independent I.T. consultant. Contact her at mboehling78@gmail.com.